Saving seeds from your backyard, flower beds and garden not only saves you money, but it is the best way to grow exactly what you want and what you know grows well on your property. There are certain colors of flowers that I love that aren’t always available at our local nursery each year. And when they do stock it, they don’t have it in the quantity I need. Instead of settling for a different color, I just grow my own and have plenty to spare. The same goes with tomatoes. I’ve experimented with about a dozen varieties in our garden to see what grow well, produces a lot of fruit, and continues producing well into the fall. When I buy tomato plants, or grow them from purchased seeds, I don’t always get the same results. By cultivating seeds from fruit grown in the garden, I know I’ll get similar results next season.
There is a general technique overview below, as well as seed-specific information at the bottom of this article.
Collection Tools
To collect seeds, I use one of three items depending on the plant and how it disperses its seeds. I usually select either a paper bag, a tall glass, or small clear plastic cups.
Some seeds like Milkweed and Oleander release their seeds from pods. They remind me of dandelion seed heads; full of unmanageable tufts that fly away when touched. For these types of seeds, I place a paper bag over the seed pods and shake the flower stalk to release the seed tufts.
Some flowers have thousands of tiny seeds that fall the second you touch the flower stalk. This includes Foxglove and Amaranthus. I slide a tall glass or vase over the flower stalk, gently bend the stalk downward, and give it a light shake so that the seeds fall into the glass. I also use a tall glass for Impatient seeds because the seed pods pop shortly after you pick them. I keep my hand over the glass as I’m harvesting so that the seeds don’t explode out of the glass when the pods pop.
For the majority of remaining seeds, I use clear cups for collection. I like clear cups because I can see how many seeds I’ve collected, spot the occasional insect that needs rescue, and I can label the cups with a marker to keep things organized.
Preparing Seeds
Most seeds don’t really need a lot of preparation other than needing to be dried out then separated from the seed pods and other debris (if any) that could harbour moisture or bacteria. You can dry them outside on a sunny day, or let them dry out indoors at room temperature. To separate seeds fromseed pods and debris, place all the dried out contents into a deep round bowl. If there are still seeds inside the seed pods, grab a small handful and gently rub them between your hands until the seeds release from the pds. Then give the bowl a good shake to separate everything. Take the bowl outside, toss the contents lightly and (at the same time) gently blow into the bowl. This will cause the dried plant materialto fly out of the bowl while the heavier seeds fall back to the bottom of the bowl.
Tomato seeds are coated with a fleshy growth deterrent that you’ll need to remove before drying. Some people use a fermentation process to remove this fleshy coating, but I prefer to soak the seeds in water with 10% hydrogen peroxide for a few hours. After a few rinses of fresh water, I dry and store the seeds as normal. This method is used for any seeds encased in pulp or flesh.
Storing Seeds
I prefer to store seeds in paper packets which are then stored in a dark, dry cupboard. I make the paper packets out of 4″ x 4″ pieces of paper that I fold in half and tape up the 3 sides with masking tape. The packets are labeled with the seed info and date. I don’t have to worry about moisture problems when I store seeds in paper, which has been a problemwith small ziplock bags.
Seed Varieties
Harvesting Impatient Seeds
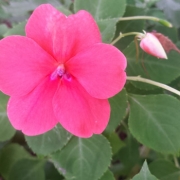
These are among my favorite seeds to collect. By collecting its seeds, we save a ton of money and the yard is always full of our favorite color each season. Is it sad to say it’s actually fun? Impatient seeds are harvested by pinching off the tender seed pods just before they are about to pop open. Place the pods in a tall, covered cup because they will pop open shortly after being removed, flinging seeds everywhere. The pods start off looking like tiny green bananas, and they gradually swell as the seeds mature. The seeds are dark brown when they are mature.
Havesting Petunia Seeds
If you have a large, full petunia plant, it takes a little detective work to find the seed pods. The seed pods start off green and will eventually look like tiny brown acorns when the seeds are mature. The tiny pods will split open and drop hundreds of minisculeblack seeds. Harvest by pinching of the seed pod. Try not to get any of the surrounding leaves because they are sticky and make separating seeds from plant material much more difficult later.
Harvesting Four O’ Clock Seeds
Four O’ Clocks produce a large, black seed which is surrounded and hidden by green 5 leaves just until it is about to fall off. The seed looks like a minature, black pinecone. If you have a large grouping of plants, set a try underneath them to catch seeds as they fall.
Harvesting Lantana Seeds
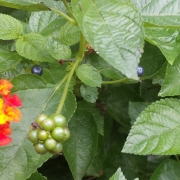
Lantanas produce a cluster of seeds that are dark purple when they are almost ripe. It’s best to wait until the purple flesh has shrunk back a little bit before harvesting to allow the seed to fully mature. These should be air dried for several days, or until the purple flesh has completely dried out, before storing.
Harvesting Joe Pye Weed Seeds
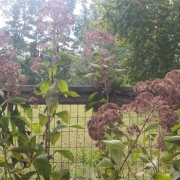
Joe Pye Weed’s seeds are mature when the large purple flowerheads have begun fading and turning to brown. Hundreds of seeds are attached to white tufts which will carry them away in the wind. Place a paper bag over a seed head and shake the flower stalk to free the seeds.
Harvesting Marigold Seeds
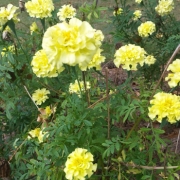
Marigold seed heads are ready for harvesting when they become dry, brown and brittle. Break off the bottom of the seed head (the cone) to make it easier to extract the seeds. Mature marigold seeds will be dark brown (almost black). If they are a light or pale brown they are probably not fertile.
Harvesting Oleander Seeds
Oleander seed pods resemble Milkweed seed pods. The pods are 3 to 4 inches long and resemble overly ripe, skinny bananas. As soon asthe pods open, they seeds are ready to harvest. Place a paper bag over the seed head and give it a good shake.
Harvesting Coleus Seeds
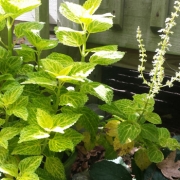
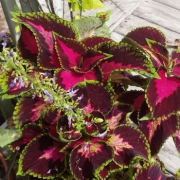 Because Coleus roots up so quickly, I prefer to propogate it versus growing it from seed. But I still harvest seeds just in case any of the plants didn’t winter over well. Harvest Coleus by cutting off the flower spike once most of the purple flowers have started to drop off, and leaving the spike in a paper bag to dry for a few day. Then shake the bag to free the seeds from the spike.