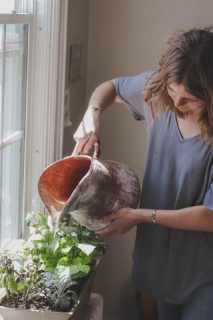
Keeping plants in the house over the winter always ends up one of two ways in our home; they are either over watered or under watered most of the cold winter season. We can’t ever seem to find a happy balance between indoor humidity levels, and neglect or too much attention. After participating in a holiday tour at a local greenhouse and observing how they kept all the different varieties of their plants watered, we decided to explore some options that would work on a small budget-friendly scale. There were so many choices; drip irrigation, capillary mats, watering stakes, etc. Again, wanting to start with the most budget-friendly options first, we decided to give plant watering stakes (the terracotta kind), smaller watering stakes (the ceramic kind), and watering globes a try. All three work by capillary action; water is delivered (drawn out) based on the water content of the medium it touches.
Overall, it would be great to reduce the time we spent watering plants and increase water efficiency by only supplying water when the plant actually needs it. Testing these out while we are here to make adjustments will also hopefully ensure that we can rely on them to keep plants alive while away on vacation. The one thing we learned is that we would never leave on vacation without having tested them for at least 3-4 days in advance.
In a few weeks, we plan on doing more testing and creating a comparison chart to document the amount of water delivery for each alternative watering method. This will be helpful in deciding which to use depending on the plant’s requirements.
Terracotta watering stakes
These do work. But indoors, it seemed that the amount of water released was the same whether the plant’s soil was wet or dry. Water delivery seemed to be about a 1/4 inch of the reservoir bottle per day regardless of soil condition or pot size. Soil within 1 inch of the stake was kept evenly moist, so keeping the stakes near the plant’s roots is recommended. Can’t see these working if the stakes are inserted closer to the edge of the pot, because the water would never work it’s way to the plant’s roots. They also work better for plants that did not have a very high water requirement. Our Hawaiian Ti was much happier than our orange bell peppers. For plants needing more water, use 2 stakes instead of just one. They are obviously too big and too tall for smaller pots, so these were primarily used for large planters (1 gallon and up).
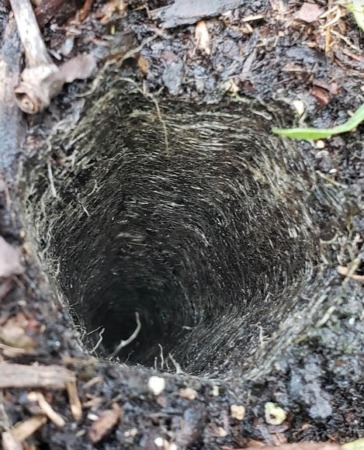
However, outdoors, these stakes worked really well especially during the heat of summer. Once the plant’s roots encompassed the stake, we found we were having to refill bottles almost daily. Here’s photo of the roots of a Greek Columnar Basil tightly wrapped around the spot where the stake was inserted:
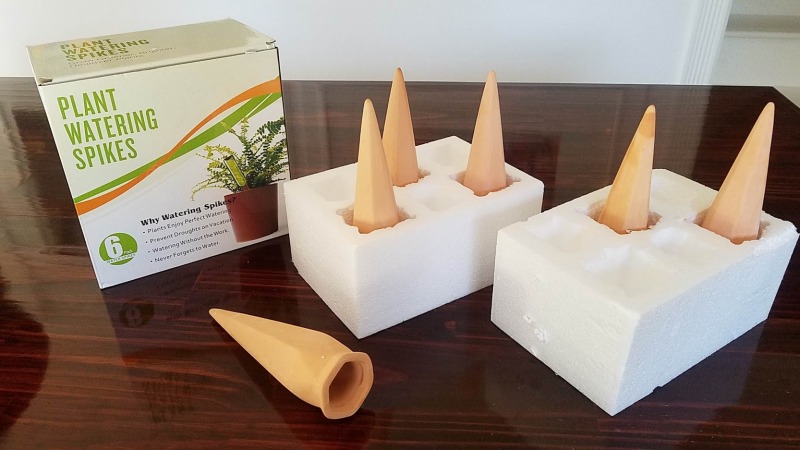
There are a lot of brands to choose from, but we went with the best price per stake, which was a set of 6. Here’s a link to the ones we purchased.
The stakes are made of a thin terracotta shell. And although the boxed instructions recommend using a long-necked wine bottle, it is easy to imagine the weight stress on the stake would eventually make them crack. Maybe not immediately, but definitely over time. And based on product reviews, that happened to more than a few people. We decided to used clear plastic water bottles with longer necks as our water reservoirs. Also, the thin terracotta is much more likely to crack if you don’t thoroughly soak it before inserting a bottle. Submerge it in water and soak it for at least 6 hours.

Then, create an opening in the soil the same width and depth as the stake. Never force the stake into the soil; it will break. Slide the stake (without the bottle) into the opening you have created and press your soil tightly around the stake. You want a solid contact surface with the soil for the capillary action to work. One thing we learned was to make sure the terracotta was completely below soil level. If any portion is above soil level, the terracotta wicks moisture upward into the atmosphere as much as it does into the plant’s soil. And although the box said to insert the stake and bottle into the soil at the same time, don’t! Insert the stake first and then insert the bottle.
Ceramic Watering Stakes
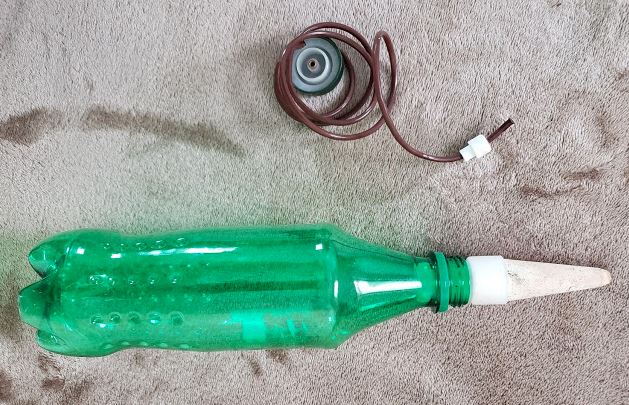
These actually ended up being our favorite watering method. These stakes are made of a porous ceramic to deliver water using capillary action. Once we identified all the quirks and addressed manufacturing/assembly problems (and there were several problems), they worked far better than the other stakes we tested. By “far better”, we mean the amount of water delivered was based on soil conditions/plant requirements and was consistent per the individual water needs of each plant.
The bonus is that for the ones that weren’t working properly, we simply converted them into bottle watering stakes by removing the cap and tubing and sliding a bottle over the neck of the stake, which worked equally as well as the terra cotta watering stakes:
These are sold under different brand names such as Blumat, HydroSpike, as well as a lot of generic versions. We went with the generic version 20 pack, which ended up costing about $1 per stake.
Despite all the things that had to be done to ensure these worked properly, once they were working it was well worth the effort. It was really nice being able to use just one water reservoir for every 6 stakes. Because the ceramic stake is only 3 inches long, these work best with plants potted in 8″ or smaller pots (or just use more stakes in one pot for larger plants or plants that require more water). The stakes need to be positioned so that they run parallel with the plants root system so that water goes where it should.
The other thing that makes these stakes our favorite is that they are fairly discrete. The stakes are barely visible and the water reservoir can be nestled in between plants and out of view.
We did check out youtube reviews before purchasing these, and honestly we don’t think any of the reviewers have actually used these based on their setup advice. Just filling the cap with with water and putting the tube in the reservoir, without any other priming, definitely didn’t work for us. Maybe it did for them, but for us it didn’t work until we primed the tubing.
Inspecting The Stakes
This is the most important step. These are very inexpensive watering stakes, and as such, undoubtedly go through little (if any) quality control. Of the 20 purchased, almost 1/3 had issues that needed to be addressed to make them function properly. Seems like a lot of effort, but it was worth it in the end. You can read more about the problems that were encountered further down the page.
- Inspect the entire length of tubing for any pinched or kinked sections.
- Inspect the underside of the cap to make sure the tubing that feeds into the side slot is not kinked or pinched.
- Inspect the plastic side opening on the underside of the cap to make sure the tubing fills the entire space.
- Inspect the bottom tip of the ceramic stake to make sure that there are no pinholes or cracks along the side.
Priming the stakes
If you’ve ever siphoned gas or cleaned a fish tank, you already have a good idea of what is involved to prime the tubing. Remove the tubing cap from the ceramic stake and submerge both the cap and stake underwater. The ceramic stake should be soaked for at least 30 minutes so that all the air trapped in the porous ceramic areas is removed. The cap with tubing should be submerged for about 5 minutes in hot tap water, then removed and the tubing straightened by slightly stretching it until it cools. If you don’t work out all the coils from the tubing, it makes setup very annoying. While it is underwater, shake the ceramic stake section until all air bubbles are out of the clear plastic portion and only water remains. With the ceramic stake still submerged, replace the cap onto the stake. You should see air bubbles come out of the opposite end of the tubing. Repeat at least 5 times; remove the cap and replace the cap to continue forcing ALL the air out of the end of tubing. When you begin to see a pretty strong stream of water coming out of the tube, your stake has been properly primed. If you don’t get a strong stream of water, there is a kink or an air bubble trapped somewhere along the tubing. Keep the stake and tubing submerged until you are ready to use them, otherwise air will re-enter the tubing.
Properly Inserting The Stakes
Unless your planter is less than 6″ in diameter, position the stake in the center of the pot so that water distribution is even. If that’s not possible, use 2 stakes on either side of the pot.
- While your primed, assembled stake is still submerged, created an opening in your plant’s soil that is wide and deep enough to accommodate the entire ceramic portion of the stake.
- Insert the stake so that the ceramic portion is completely in the soil, and the clear plastic section of the stake is above soil level.
- Avoid inserting the stake at an angle, if possible. Leaks seemed to be more common when the stakes weren’t sitting completely upright.
- Position the stake so the place where the tubing leaves the cap is visible. This is the location where most leaks will occur and it will make it easier for you to spot them.
- Press soil tightly around the ceramic stake.
Setting Up The Tubing
As soon as the ceramic stake has been inserted into the soil, feed the end of the tubing into a water reservoir. The goal is to have the end of the tubing lying on the bottom of the reservoir. The small white ceramic tip on the end of the tubing really isn’t helpful in keeping the tubing at the bottom. The tubing’s tendency to coil sometimes makes the end of the tubing turn upward, closer to the middle of the reservoir. If you didn’t already heat the tubing in hot water and straighten it out, you may need to add a small weight to the end of the tubing. A large metal hexagon nut or fishing line weight will work.
Water Reservoir At Proper Height
The water line in your reservoir (a bucket, a plastic water bottle, etc) should be at the same height or lower than the ceramic stake, ideally a few inches below. If it is positioned higher than the stake, the water is delivered by gravity rather than capillary action, and your plants will be end up being over watered.
Testing
The nice thing about these stakes is that one water reservoir can be used to hold the tubing for multiple plants. But before you do that, you should test each individual stake by only using one water reservoir per plant for at least 2 or 3 days. That way you will be able to see if each individual stake is functioning properly before combining all the tubing inside one reservoir. You will also be able to ensure that individual plants are getting the amount of water they need.
Problems, Troubleshooting, And Fixes
Production And Assembly Defects
Pinched Tubing
On a few stakes, the tubing had been twisted onto itself causing it to be pinched in the middle. Using a blow dryer set on low, we were able to warm up the tubing just enough to stretch and squeeze the tubing back into proper shape. But more commonly, the tubing was pinched at the spot where it is fed into the opening underneath the cap. To fix this, we fed the tubing further into the cap until the pinched section appeared at the center. Again, we heated it using a blow dryer to reshape it, then fed it back into position.
Leaking
Some of the watering stakes were drawing 3 times more water out of the reservoir than the others. And water was accumulating on the bottom of our plant trays. They were definitely over watering the plant. After closely observing some of the problematic stakes, small droplets of water could be seen continually dripping out from under the cap where the tubing entered. On others, there was no visible water inside the plastic portion of the stake. The problem ended up being caused by one of four things.
-
-
- (user error) The water line in the reservoir was higher than the ceramic stake.
- The tubing that led into the cap was pinched at the opening (located inside at the side opening underneath of the cap), which left a small opening for water to enter. We fixed this by heating the tubing and reshaping it to remove the pinched section so it could occupy the entire opening.
- The plastic opening where the tubing entered the inside of the cap was slightly larger than it should be, allowing water to enter from around the tubing. We used a small amount of silicone caulk to seal the opening.
- A small pinhole or crack on the end of the the ceramic. This may have been caused due to pressure while we were priming, maybe the tip was damaged when we inserted the stake, or maybe it arrived that way. Either way, we used silicone caulk to cover the pinhole and hairline cracks to stop the leaking.
-
If you still have problems after all this, repeat the inspection and priming process to see if you missed something.
Watering Globes
After having used glass watering globes to supplement plant watering during the summer heat, there’s one trick I’ve learned to make them actually functional (versus being merely decorative water vessels). Our watering globes have narrow long glass stems that are inserted into the soil and are supposed to gradually release water as needed. But even during scorching hot days, the water remained in the globe section and the plant’s soil still required daily manual watering. After inspecting the globes, it became obvious that soil was packing tightly into the narrow stems as they were inserted into the planter. Cleaning them was next to impossible. What made them work properly was to insert a cottonball 3/4 of the way into the opening tip of the stem. And instead of pressing the stems firmly into the soil, we first created an opening in the soil using a dowel with a diameter similar to the watering globe’s stem. Then the stem was placed into the opening and we pressed soil around it to hold it securely in place. The cottonball served two purposed; (1) it prevented soil from entering the stem and (2) it acted as a wick to draw water out of the globe and into the soil as needed. You could substitute a cotton wick in place of the cottonball.