Given how much we enjoy gardening, it seemed worth it to give a mushroom growing kit a try. We love cooking with mushrooms and if we can manage to grow them in a kit, maybe there’s a chance we could start growing them regularly as a hobby for our own consumption. The kit seemed like an easy way to see if we have what it takes to be mushroom farmers, before investing in all the supplies needed for serious mushroom cultivation. Oyster mushrooms are considered the easiest to grow, so we wanted to try those first.
We picked up our kit from Amazon, and chose the Back to the Roots Organic Mushroom Farm Grow Kit (the Gourmet Oyster Mushrooms version), which are actually Pearl Oyster mushrooms. It has fairly good reviews, and if our results are anything like what’s pictured on the box, we would be harvesting a bunch of oyster mushrooms in less than 10-12 days. Here’s the link if you’re interested:
In reading the product’s comments section, reviewers’ harvest results seemed to vary; anywhere from 50 grams to 160 grams the first harvest. Fresh oyster mushroom prices can average between $7 to $15 dollars a pound. At best, if you only try for one round of mushrooms you might harvest 1/3 a pound for the cost of the kit. But you can try for a second flush of mushrooms to increase your yield by repeating all the instructions, this time using the opposite side of the substrate bag. More on that below.
Instructions
A brochure with instructions was included in the box, and they were well illustrated and pretty straightforward. However, you should also watch the manufacturer’s video because it includes important additional details that are not in the instruction brochure (this is explained further down the page). The visual guide on harvesting was also really helpful.
- Tear off the perforated flap on the front of the box.
- Use a knife or box cutters (box cutters worked better) to cut an X into the plastic inside the box window.
- Use a fork to score the substrate within the X areas of the plastic to encourage growth
- Remove the substrate from the box and soak it with the X side facing down in a bowl of water for at least 6 hours (overnight is better)
- Return the substrate to the box, set it near a window with filtered sunlight, and mist with 7-8 squirts using the included bottle twice per day.
Once we finished following all the instructions we sat the box upright on our counter top near a window with filtered sunlight and misted inside the X area twice a day, just like the picture and instructions in the brochure.
However, when we reviewed the instructional video from Back To The Roots on the product’s website, they recommended the box be on placed it’s back (X face up) until the mushrooms start pinning, and that the substrate should be watered at least once a day with about 2-3 teaspoons of water. There’s definitely no way we were providing 2-3 teaspoons of water by misting 7-8 sqirts twice per day. In fact, 16 squirts using the included misting bottle only provided 3/4 teaspoon of water. So after watching the video (on day three), we laid the box on its back (versus standing upright) and provided a measured 3 teaspoons per day with a light misting in between if needed (versus misting 7-8 squirts twice a day).
Further research on oyster mushroom cultivation indicated that they prefer 80%+ humidity. Covering the substrate with a clear plastic tent was a common method for at-home growers. We decided to create a mini tent dome of plastic wrap with small 1/2 holes over our kit because we knew our indoor humidity levels were less than 60%. The goal is to increase humidity levels but also maintain good air flow.
Our Results

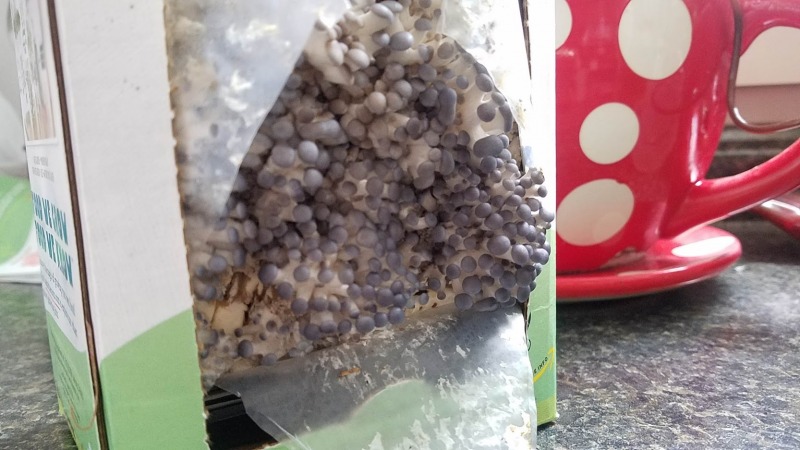
On the morning of the 5th day after starting the kit, there were several blackish, clumpy mold-looking masses growing under the X. They didn’t resemble the cute, tiny pinheads that others shared in their photos. The instructions said the mushrooms begin to form around day 7, and it was only day 5, so we assumed we failed and were just growing mold at this point. No sense in becoming mushroom farmers if we can’t even grow mushrooms from a kit! But, to our relief, later that same day the moldy-looking clumps began to form into tiny little clusters of mushrooms. These tiny little clusters weren’t tiny for long. As promised, they doubled in size every single day over the next 4 days.
There were even tiny mushrooms trying to push out from the inside and bottom of the box, so we decided to remove the kit’s cardboard box and sit the bag out on its own to give all the mushrooms room to grow. Since most of our mushrooms were growing near the bottom of the bag, we elevated the bag so mushrooms weren’t growing on the counter top.
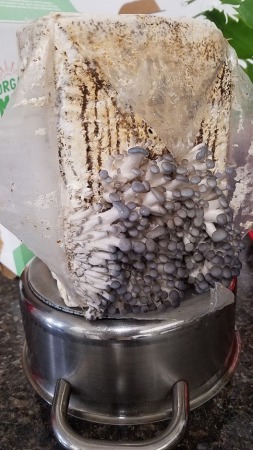
By the 10th day after starting the kit, it was time to harvest the mushrooms. The two largest mushroom caps had already flattened the day before, and were beginning to crack on the 10th day (ready to harvest!). With a light tug/twist the entire mushroom mass easily snapped off the block. Our first harvest netted 120 grams (4.2 ounces) of fresh oyster mushrooms (more on our 2nd and 3rd harvest below).
Harvesting Oyster Mushrooms
The brochure recommended harvesting the mushrooms once the caps were 1-2 inches wide. The video provided a little more detail with images, and compared when it was too early, too late, and just right to harvest. Most internet advice sites recommend basing harvest on the characteristics of the largest mushrooms in the cluster.
Oyster mushrooms begin to “pin” (form) after around 7 days, and are ready for harvest 3-5 days later. Once they have started pinning, you should see the mushrooms double in size almost every day. The mushrooms should be ready to harvest 10-12 days after you started the kit.
Too Early
The oyster mushrooms are still a darker shade with more hints of brown. The majority of the larger, more mature caps are still dome-shaped (convex) instead of flattened out or starting to turn concave.
Too Late
The majority of the mushrooms are larger than 2 inches in diameter, the mushroom caps are flattened or cupped and concave, and (most importantly) the edges of the caps have begun to split or tear.
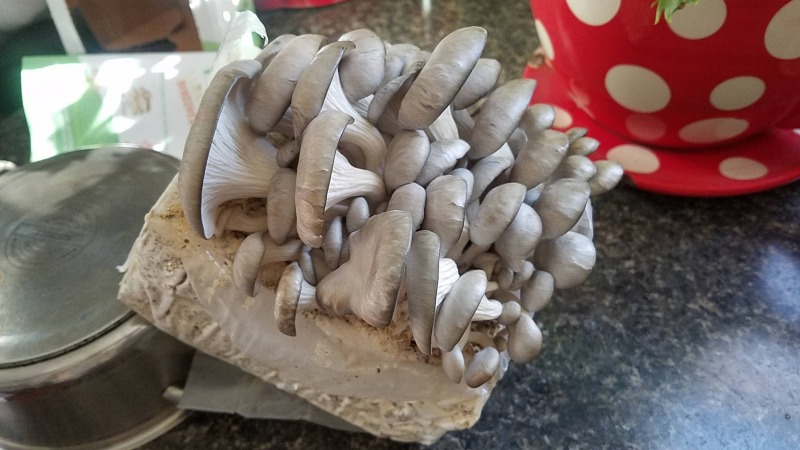
Just Right
The majority of the mushroom caps are a lighter shade of tan/brown, are around an average of 2 inches in diameter (a few can be larger or smaller) and have just started to flatten out on the top. A few may have caps that are starting to turn slightly upward (becoming cupped or concave), but their edges are still smooth and not torn or split. This is usually 3-5 days after you first see the mushrooms begin to form (pinning), or 10-12 days after you started the kit.
How To Harvest
When your mushrooms are ready to harvest, grab all of them by the base, slightly pull on the base and twist to remove them. You have to harvest all of them at once; not a few here or there. The video said that you can also cut your mushrooms off, but don’t do that if you are going to try to try for one more harvest. Cutting the base may leave behind portions of the mature mushrooms, which will begin to rot and contaminate the substrate.
Try For Second Harvest
If you want to try for a second harvest, tape up the cuts you originally made in the bag and let it rest for a day or two. Then, just repeat all the initial instructions (soak, water, watch). But this time make your cut on the opposite side of the substrate bag. You may need to be a little more generous with water since there is already an opening from the original harvest. Humidity/moisture/air (in the right amounts) is key. Or better yet, place some tape over the original opening so that the bag holds in moisture. The second flush is usually a little less vigorous but you should get a few extra mushrooms.
We routinely use seaweed extract as a growth hormone for our plants and read that commercial mushroom growers also use it for mushrooms. Several studies indicated that seaweed and seaweed extract at 5-10% increased mushroom yields. Using the same strength we use for plants, we added 1 TBSP of extract to 1 quart of treated tap water (we treated it with hydrogen peroxide to remove chlorine and other salts). Then soaked the mushroom brick in a 50% extract/50 % water solution for 10 hours.
Our second harvest was much smaller (maybe 2.5 ounces of mushrooms), but we were also not as diligent about watering. So we figured we’d used the mushroom cake to inoculate some straw. More on that below.
Try For A Third Harvest?
A third harvest is possible, but the nutrients in the substrate may be depleted so you’ll have to provide a new substrate, especially if your second harvest didn’t yield many mushrooms. You can try to supplement the original mushroom cake with a seaweed extract soaking to try for a 3rd harvest, you could use the mushroom mycelium on the cake to grow your own spawn, or inoculation another medium like straw using the original cake to grow more (we opted for this option).
Get some straw (cut to 3-4 inches in length) and simmer it in 140 degree water for 4 or more hours, then squeeze out and drain until damp and there is no water dripping. You can also add used coffee grinds and sawdust while heating the straw. The water temperature shouldn’t go too much above 140 degrees, because your goal is to kill the bad bacteria without destroying beneficial nutrients. Then, in a clean, sterile bowl, crumble up the old mushroom cake into pea-sized pieces. Mix the straw and old crumbled substrate together. You have now inoculated your straw substrate.
Pack everything tightly into a gallon-sized freezer bag. Cut a quarter-sized hole into the middle of the freezer bag and cover that with a piece of coffee filter and tape securely into place. This will allow some air exchange and hopefully prevent too much moisture loss and minimize contaminants. Place the bag in a cool, dark location. Check on it occasionally. You’ll know you were successful when you begin seeing white strands spreading through the substrate within 3-7 days.
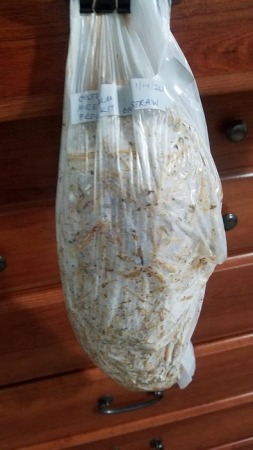
We didn’t have any freezer bags, so we just used a small garbage bag. We weren’t really trying for a defined shape, and ended up with an oblong log shape. We did this around the same time we tried a few other mushroom cultivation experiments.
Within 10 days, mycelium was starting to grow throughout the bag.
Third Mushroom Kit Harvest Spawning
Once the bag is completely filled with this white material (in about 3-5 weeks), you are ready to prep it for growing (fruiting) mushrooms. Cut an X in the bag, soak it for a few hours, set it on a counter and mist daily.
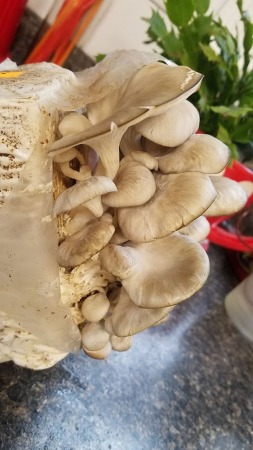
Our mushroom cake started putting out pins before we had time to prep it for fruiting. And the pins were popping out everywhere and mushrooms were forming inside the bag, so we just opened up the bag and let it do its thing. The longer stems on this batch are the result of not providing enough fresh air exchange as the pins were developing.

Third Mushroom Kit Harvest Fruiting
If at any time you see green or brown mold growing on your mushroom cakes, it means bad bacteria has infected the substrate. If you catch it early enough (when it first appears and while it is still small), there are a few options you can try. There’s no guarantee that you can completely eradicate the bacteria, and you risk introducing new contaminants in the process, but you really don’t have anything to lose at this point. You can soak a qtip with isopropyl alchohol and dab it onto the bacterial growth. If it is a larger growth, dilute some honey in 50% distilled water and pour it over the bacterial growth. If there are several small areas of contamination, mix in some oregano leaves. Otherwise, you can toss it all out or into your garden/compost pile; and just maybe some more mushrooms might grow.