
The process is actually pretty straight forward.
- Load Samsung drivers on your computer.
- Download and install Odin on your computer.
- Download your phone’s firmware combination files and load the files into Odin software.
- Connect your phone to your computer using a USB, activate your phone’s download mode, and install the firmware using Odin.
Easy enough, right? But there’s a catch. You have to have the firmware combination that exactly matches what was installed on your phone (and which also contains the right CSC file (country or carrier specific configuration). When these sites were directing us to specific firmware, it would have been nice if they explained to which phones and which Android versions those files were compatible.
Step One
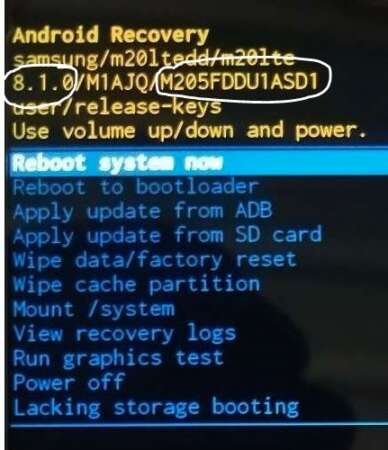
- The model number (i.e. Samsung Galaxy S9+ SM-G695U)
- The PDA (the 13 character code of the installed software version i.e. G965USQS7CSK4)
- The installed Android version (i.e. Android 9 – Pie)
- The network carrier (Sprint, Verizon, etc). CSC is a country or network carrier specific setting.
- This is important if your phone is locked to a specific carrier. You will need the correct CSC in order to activate the phone in their network.
- Common CSC Codes
- ATT (AT&T branded)
- BST (BST unknown)
- CCT (Comcast branded)
- “SPR”, “Sprint (CDMA) branded”
- “TFN”, “Tracfone branded “
- “TMB”, “T-Mobile branded”
- “USC”, “USA unbranded”
- “VMU”, “Virgin Mobile USA branded”
- “VZW”, “Verizon branded”
Step Two
Install Odin and Samsung drivers on your computer
-
- https://samsungodin.com/download/
- Scroll to the very bottom of the page for the latest release (it was v3.13.1 in June 2020 https://samsungodin.com/download/Odin3_v3.13.1.zip)
Step Three
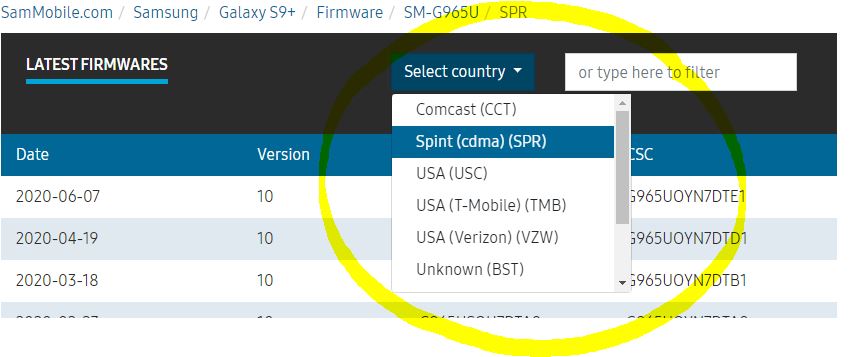
Go to sammobile.com and get the correct firmware for your phone.
- Start your search by entering the model number of your phone.
- You’ll then be provided with a long list of firmware options. Scroll through the list for your phone’s PDA software version (i.e. G965USQS7CSK4) and corresponding Android version (i.e. Android 9 – Pie).
- You’ll then be asked to refine the results by country, which is actually the CSC if your phone is locked to a specific carrier/network like Sprint or Verizon (remember to use one of the three letter CSC codes from Step One).
Once the list of firmware options has been refined to CSC/Country, select and download the one that matches your PDA and Android version. 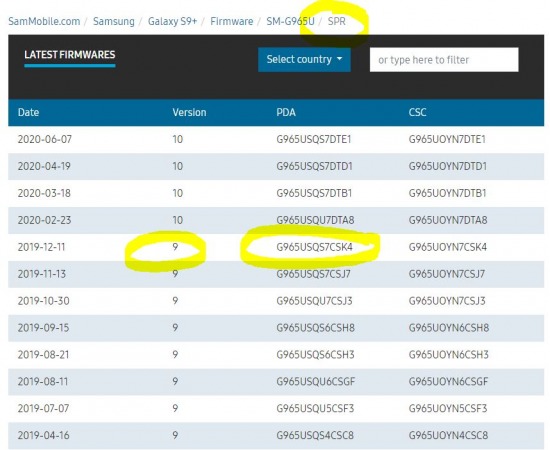
Extract the files into a folder on your computer. You’ll be receiving 6 files, but you only need four of them (you’ll be using the ones that start with BL, AP, CP, and CSC).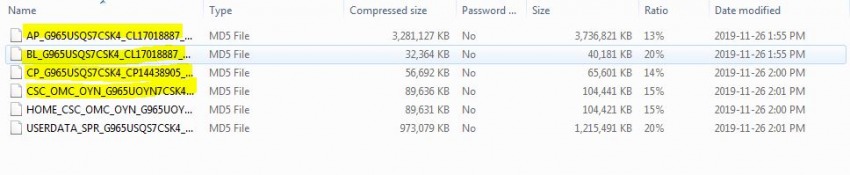
Step Four
Get your phone ready to download the firmware
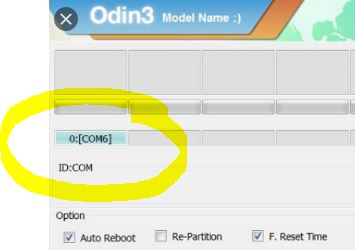
Open Odin and connect your phone to your computer using a USB. You’ll know the phone is properly connected when the box near the top left above ID:COM shows an active comm port.
To activate your phone so that it is download mode, press and hold the volume down button, the bixby button, and finally the power button for 4+ seconds. Once your phone’s screen displays “downloading”, press the volume up button to continue.
Load the firmware into Odin
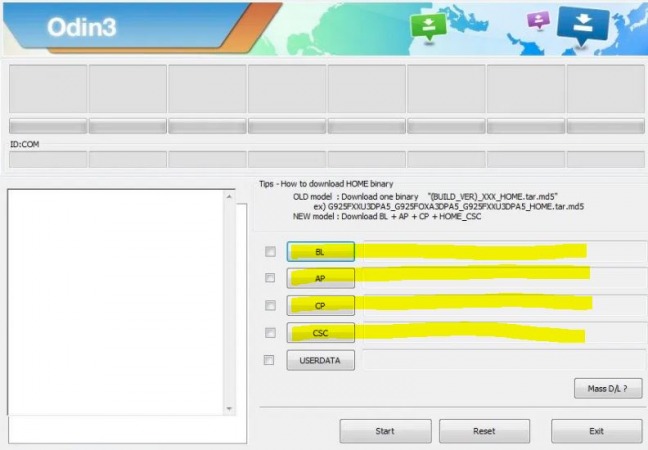
On the bottom right of Odin software, there will be 5 input boxes for you to add the firmware files you downloaded. Remember, you will only be using 4 of them. Ignore the Userdata section; you won’t be needing it.
Click on the BL button and add the firmware file that starts with BL. Repeat this process for the AP and CP buttons. For the CSC button use the file that starts with CSC, do not use the HOME_CSC file.
The HOME_CSC… file keeps all your phone’s apps and data. It’s like a soft reset. If you use that file, you will be right back where you started…locked out of your phone.
Once all 4 files are loaded, click the Start button at the bottom. It takes about 5 minutes or so for you to flash your phone’s firmware.
Once the firmware has been downloaded to your phone, it will reboot itself and you should be returned to the Welcome setup screen. You will know you were successful once you reach the screen to add a Google account. If you receive a “Integrity verification has failed” notice, this means the combination of firmware files you tried to use were not the correct version for your phone.

