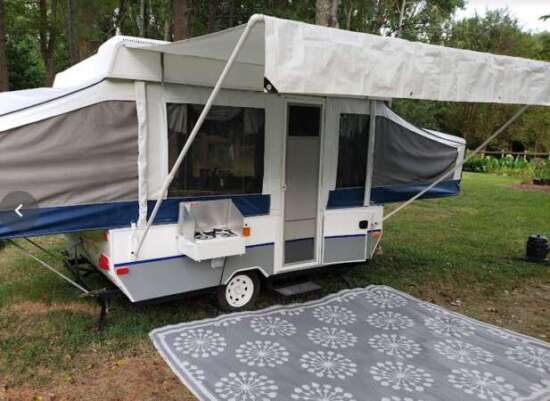
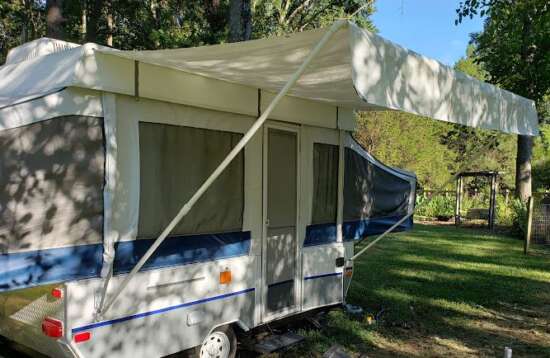
This was the final project for our pop-up camper remodel. We wanted an awning that didn’t look “DIY” and that had support arms attached to the camper (versus poles that are staked to the ground).
We used nylon webbing to make straps so the awning could be strapped to the camper roof when not in use. Overall, it turned out great and the camper is now officially ready.
Supplies Needed
Links to Amazon for some of these supplies are provided, if available.
- 8 x 10 white tarp 10mil
- one pair adjustable aluminum pole brackets
- two 1″ schedule 40 PVC pipes – 10 foot lengths that will be cut into four 5 foot long pieces
- two 1″ PVC couplings
- two 90 degree 1 inch PVC elbows
- one 10 foot 3/4 EMT pipe
- two 3/4″ EMT insulating bushings
- 10′ of 1″ nylon webbing (any color)
- snap fastener kit #1265
- six 3/4″ trim screws (or modified truss head screws)
- If you have an awning channel: 12 feet of coax cable (the kind used for cable TV connections)
- If you don’t have an awning channel and aren’t going to buy one: 12 1/2″ trim screws (or modified truss head screws)
- UV resistant high strength outdoor thread
Tools Needed
- Drill
- Hacksaw
- 3 hand clamps
- Ladder
- Hammer
- Box cutter (for trimming the plastic bushings)
- Scratch or punch awl (or anything to make a hole in the nylon webbing
- Sewing machine (to sew channel into tarp for EMT pipe)
How To Make The Awning And Awning Supports
Here is a quick step by step guide, with a more detailed explanation below. Be prepared to assemble and disassemble supports at least once or twice in order to get proper adjustments.
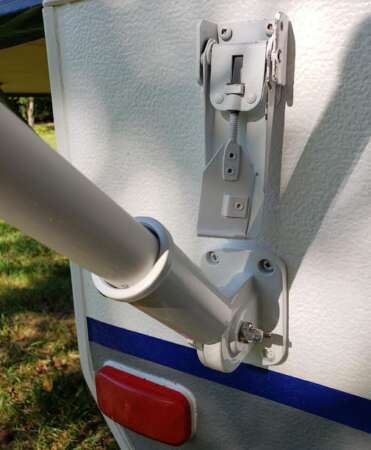
- Mount the pair of adjustable pole brackets just below the camper’s latches. This area near the latches usually has wood supports inside.
- Cut each PVC pipe
- Assemble the awning support using the 3/4″ EMT pipe, the insulated bushings and the 90 degree elbows. You will need to trim the bushings to make them fit.
- Attach your white 8 x 10 tarp to the camper (this depends on whether your pop-up has an awning channel).
- Insert 2 PVC pipes into each of the 90 degree elbows on the EMT pipe, 2 PVC pipes into the pole brackets, then connect the poles using the PVC pole connectors. You will need to use a ladder or long section of lumber to temporarily support the EMT.
- Drape the end of your tarp over the EMT.
- Use the 3 hand clamps to clamp the tarp to the EMT pipe. Reposition the clamps until your tarp awning is at your preferred angle.
- Use a pen or pencil to mark the points where the EMT channel should be sewn together on the tarp.
- Remove the tarp and sew a channel along the tarp for the EMT channel based on the marks made from previous step and then reattach the tarp to the camper.
- Take apart the pipe supports then slide the EMT into the tarp channel that was just sewn. You may need to temporarily remove the PVC elbows.
- Reconnect 2 pipes to the pole brackets, 2 pipes to the EMT elbows, then connect the pipe ends using the PVC connectors.
Mounting the pole brackets
Diy Camper Awning Supports
We mounted our pole brackets directly underneath our camper’s latches. There are wood supports inside for added latch stability, so this was also the ideal location for the brackets.
Cut the PVC pipes
There were 3 reasons we cut the PVC pipes into 2 pieces:
- A 10 foot pipe wouldn’t fit inside the camper for storage.
- The uncut pipes had a tendency to bow, but didn’t when cut and reconnected using a connector.
- It was difficult for one person to put up or take down the awning when the pipes were 10 feet long. It was much easier to put half a pipe in the pole bracket, the other half in the EMT elbow, and the connect the two ends together.
Assemble the EMT tarp support pipe and fittings
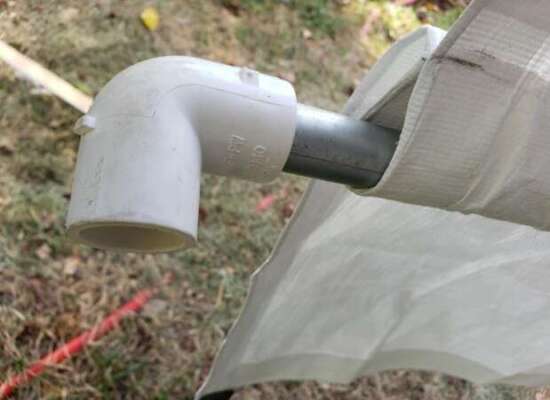
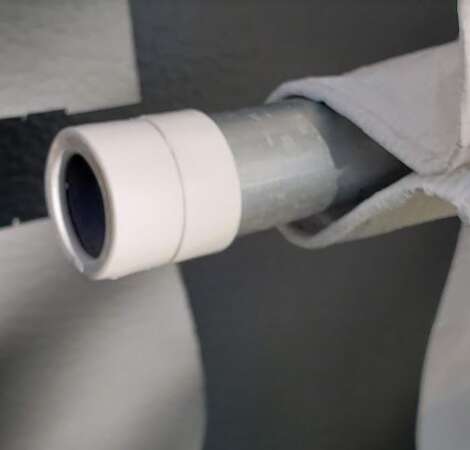
We initially used 1″ PVC pipe for both the support arms as well as the tarp awning support. The PVC that supported the tarp unfortunately kept bowing, so we had to switch to rigid 3/4″ EMT pipe.
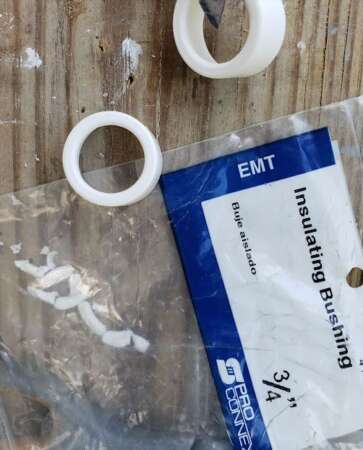
In order to still be able to use the 90 degree elbow fittings, we had to add bushings to the EMT to get a snug fit. It is difficult to see in the picture below, but we cut off the overlapping lip of the bushing using box cutters. The lip prevented the bushing from fitting inside the elbow fitting, so the only option was to remove it.
Diy Camper Awning Pipe Bushing
With the lip removed, we were able to push the bushing flush onto the EMT pipe. All that’s left is to add the 90 degree angles onto both ends of the pipe.
Diy Camper Awning Bushing Attached
Attach tarp to camper
This step helps you decide on the angle you would like your awning positioned once it is up. It’s important to know that you will have to remove and then reattach the awning once more after this step.
If you have an awning channel
If you have an awning channel attached to the top of your pop-up camper, you can use coax cable to create the insert that slides the tarp into the awning channel. Surprisingly, coax cable was a perfect fit and allowed the tarp to be fed through the awning channel fairly easily.
To make the cable insert, lay the coax cable about 2 inches from the end of the tarp. Fold the end of the tarp over the coax cable. Pin the tarp and sew. Trim the cable so that you have roughly 1.5 inches sticking out at each end of the sewn tarp. Then gradually feed the insert through your awning channel.
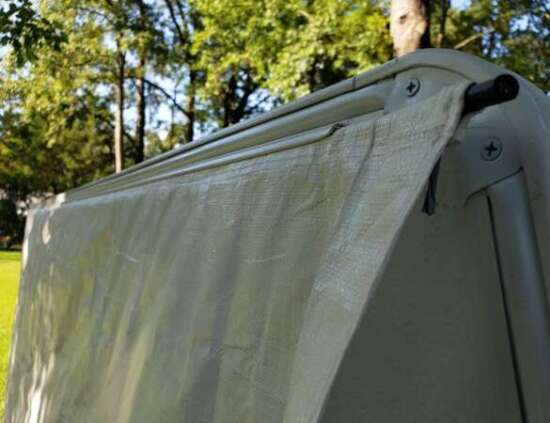
Diy Camper Awning Channel Insert
If you don’t have an awning channel
Without an awning channel, one option is to screw the tarp onto your camper top. You will want to position the tarp directly underneath the trim. Use 12 1/2″ trim screws (or modified truss head screws) spaced evenly apart.
Assemble your awning supports
This next step is where you will decide on the angle for your awning as well as where you need to sew a channel for the EMT support pipe. We needed two people for this step.
Start by inserting one 5′ PVC pipe into each the pole brackets you installed on your camper and add a PVC connector to the end of each pipe.
Insert the two remaining 5′ PVC pipe pieces into the elbows of the EMT pipe.
Have a ladder ready to rest your EMT pipe on, then lift the pipes connected to the EMT and insert each into the connectors of the pipes in the pole brackets. Rest the EMT pipe on the ladder to take pressure off the pole brackets.
With your 3 hand clamps nearby, drape the end of the tarp over the center EMT pipe. Clamp the tarp to the EMT pipe at the center and then at both ends. You can won’t need the ladder for EMT pipe support anymore.
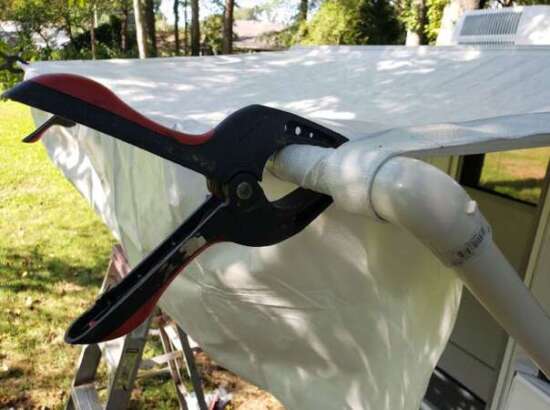
You can now adjust the clamp positions until the awning is at an angle you like. We preferred our awning to sit pretty high and only at a slight angle. You might want your awning to have more of an angle to allow for rain run-off.
Once you are happy with the position of your awning, use a pen or pencil to mark where you will sew the channel for your EMT.
You will need enough allowance in your channel to sew a double stitch and to overlap the elbows.
Remove the tarp and sew your EMT channel.
Strapping The Awning To The Camper When Not In Use
Most pop-up camper awnings are the bag type. The bag is permanently attached to the camper roof. The awning and its supports are rolled up and tucked inside the bag when not in use.
Our DIY awning secures to the camper’s roof using nylon support straps. The PVC support arms are stored inside the camper when not in use.
How to make awning support straps
Diy Camper Awning Strap Installation – bottom strap
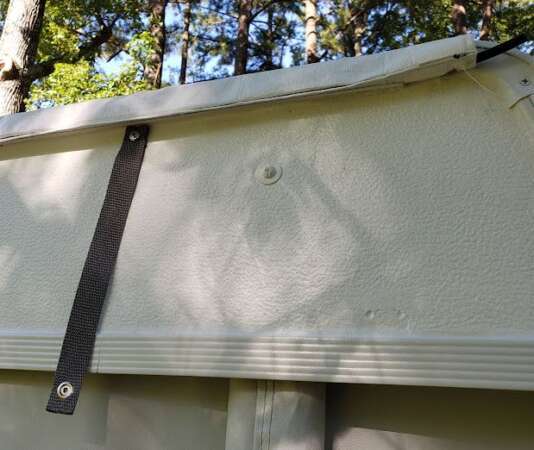
To make our support straps, we used nylon webbing and a snap fastener kit. Each support strap comes in two parts. One that is attach to the top of the camper and the other is attached just below it on the side of the camper’s roof.
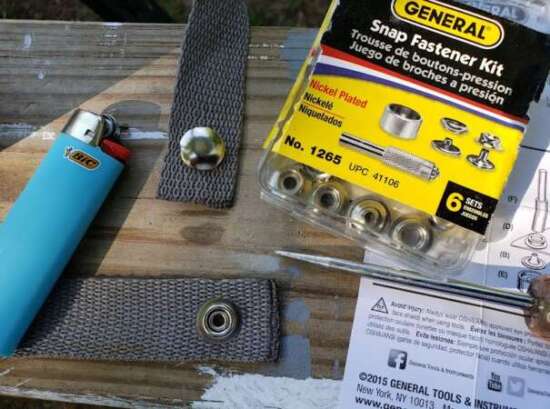
Diy Camper Awning Strap Supplies
We used lighter to melt the cut ends of the nylon webbing and a punch awl to make openings in the webbing for the snap fasteners.
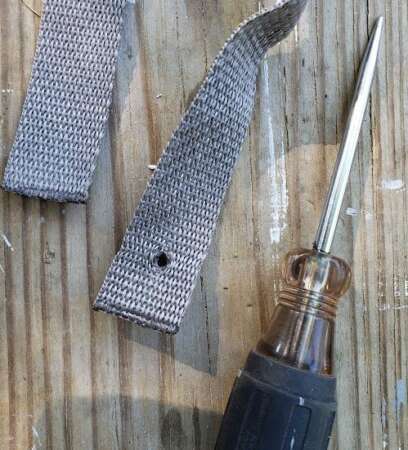
Diy Camper Awning Strap Prep

Diy Camper Awning Strap Snaps
We make 3 sets of awning support straps. Each set had a top and bottom strap.
Diy Camper Awning Strap Position
One strap was attached in the middle and the other two were attached approximately 12 inches from the edge of the awning. The bottom straps were screwed into the side of the roof, just below the awning channel. The top straps were screwed onto the top of the roof, directly above the bottom straps.

