The DIY hummingbird ant moat guard is simple to make and also works well in keeping ants off the hummingbird feeder. It makes feeder cleanings easy because we don’t have to worry about reapplying mentholatum ointment after each washing. However, it does mean we have to routinely monitor the water levels in each of feeders throughout the day. The water in the ant moat guard evaporates fairly quickly in the heat of the summer. The water also tends to spill out a bit during high winds. The ants must keep a close watch on the water levels, because as soon as the water is gone the ants are back. But otherwise, it works really well.
All it takes is some metal wire, a bottle cap, some decorative beads (optional) and hot glue. Once you’ve assembled it and hung it up, fill the cap with water and you’re done!
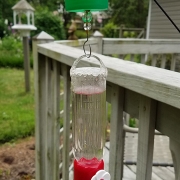
Here’s the finished ant guard:

DIY Hummingbird Feeder Ant Moat Guard Supplies

- You’ll need approximately 8 inches of wire (16 or 18 guage). We used stainless steel.
- A bottle cap – it should be at least 1 1/2 inches in diameter and at least 3/4 inches tall
- Two or more decorative beads (optional)
Tools needed:
- Hot glue gun and hot glue sticks
- 2 needle nose pliers
- Something to use as a circle form that is about 3/4 to 1 inch in diameter. We used a permanent marker.
- A drill and drill bit with same diameter as the wire
Directions
- Drill a small hole in the center of the bottle cap.
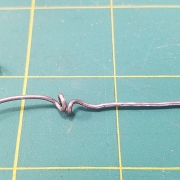
- Using your needle nose pliers, wrap the top end of the wire around the base of something round such as a large permanent maker to make a circle. This will serve as the top hanger.
- About 1/2 inch below the wire circle, use your needle nose pliers to make a circular crimp. This will function as the top “stop” for the wire.
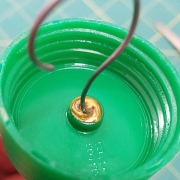
- Feed the wire through the hole in the bottle cap until the crimp (or “stop”) you just made is flush with the inside bottom of the cap.
- Apply a large bead of hot glue over the wire crimp on the inside bottom of the bottle cap to secure it into place.
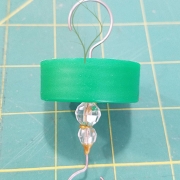
- Once the glue inside the cap has hardened, slide a decorativebead up along the wire until it is almost touching the outside bottom of the bottle cap. Add hot glue to cover the hole at the bottom of the bottle cap and slide the bead into the bed of glue and push firmly and hold until the glue hardens. Add a bit of hot glue to the bottom of the bead to secure it into position. Add additional beads if desired.
- About 1/2 inch below the decorative beads, again use your needle nose pliers to wrap the wire around the base of something round to create the bottom hanger/hook.
- Trim off any excess wire.
Here’s the finished ant guard:


That’s it! The ant moat is ready to use. Just attach to your feeder and fill with water.
Here are a couple of tips that may help:
- For these pictures, we used the cap off a vegetable oil bottle. It worked out nicely because it was the perfect size, plus it had a little raised well in the center to help stabilize the wire crimp.
- Using something as a round form for the hangers helped acheive almost perfect circles. Pull the wire tightly around your form and make a complete circle. Once you’re happy with the results, trim off enough wire to make an opening in the circle.