If you have leftover slats after adjusting the length of your faux wood blinds, or you are replacing existing blinds, hang onto those slats because you’ll find they have a lot of uses for projects and crafts around the home. Whether you’re looking for a way to repurpose leftover slats, or want to upcycling slats from blinds that you no longer need, you’ll find a practical use in one of our projects.
Faux wood blind slats are made of vinyl or PVC material and are durable and waterproof; making them perfect for a variety of alternative indoor and outdoor uses. They are relatively easy to cut (see our tips), can be drilled and sanded, and glued together nicely with a hot glue gun.
Although the slats will snap if bent or if too much force is applied, they can be slightly bent by heating them in hot water. They’ll hold the new shape once they cool back down to room temperature.
If you don’t have any leftover faux wood slats, for some of these projects you can substitute foam core poster board, leftover composite wood flooring planks (the waterproof kind) or pine lath slats (which may need sanding/painting first). Or any other thin material that is or can be cut into 2 inch widths.
Cutting Tips
You can achieve the cleanest cuts by using a compound miter saw with a fine tooth blade. But you can also cut them using a good pair of scissors or a utility knife. Finer detail cuts can be made using a craft knife. If you use scissors, sharpen the blades and make smaller cutsas you go rather than large, forceful cuts.
Creative Projects For Repurposing Faux Wood Blinds
The 2 inch wide slats are ideal for many crafts and projects. Since they are waterproof, they are ideal of outdoor uses too. This is just the start of the project list and we’ll keep adding photos soon. More projects will be added as we keep finding new uses for all these slats.
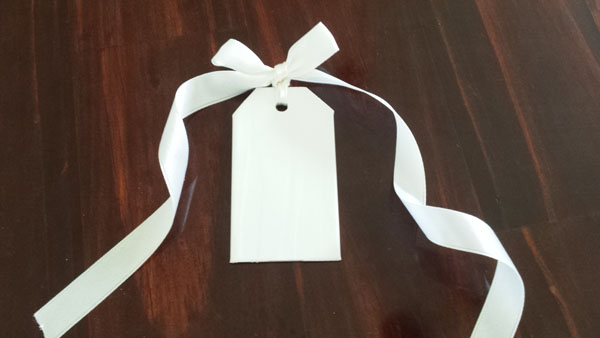
Gift Tags
If you need a substantial looking gift tag, or one that can hold up outdoors, cut a 3 1/2 inch section of slat then cut angles at one end a 1/2 inch from sides and top. Drill a hole and add a ribbon. These gift tags can hold up to wind and rain, so they are perfect for presenting a gift such as a plant, tree, car, or anything else that would be given to the recipient outdoors.
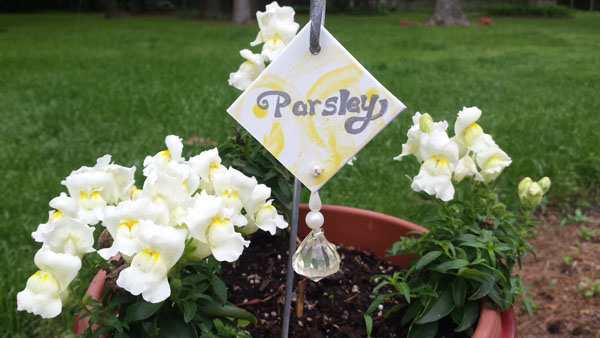
Hanging Plant Labels
Using a 2 inch section of faux wood blind salt, drill holes at opposing corners, decorate (maybe even add some bling), and you’ll have the prefect plant marker for potted plants and your garden.
See the project here
Seating Place Cards and/orBuffet Food Labels
Create sturdy place cards or food labels that are ideal indoors or out by cutting a 3″ x 2″ section of material. Affix a trapezoid-shaped flap to the back using hot glueand place into a standing position. You can decorate the label and either write directly on it or add a printed piece of paper containingthe guest’s name or food item using double sided tape.
Garden PlantMarkers
These giant garden markers won’t get obscured as your garden grows. They also make great gifts for garden enthusiasts. Use a 10 inch section of slat and cut a tapered end.
See the project here

Organizing Cubes Or Trays
By creating a tray or cube, the slats can be repurposed into perfect trays for organizing nail polish, office supplies, spices, crafts, and pretty much anything else. A high temp hot glue gun should be fine for assembly; otherwise you might use an adhesive such as E6000 for a more secure bond.
Drawer Dividers
Just like the ones you buy in the store, these slats can create awesome drawer dividers. You can create cubbies for any size. Just cut opposing slots in the slats that interlock them to fit together.
Earring Holder/Organizer
Neatly organize your earrings by drilling paired holes along a length of slat. Drill two larger holes at the very top of the slat and feed wire or a pretty ribbon to hang the earring organizer in a closet or a hook.
Mini Trellis
The trellis size will be dependent on the length of your slats. The slats are pretty sturdy, but if they’ll be unsupported you should probably keep the trellis under 2 feet in height. The base of the trellis should be slightly narrower than the top. You’ll need 3 sections at 2 feet in length. Then cut sections of slats to use as cross-braces. Affix them at 2 or 4 inch intervals using hot glue.
Door Hangers
Here’s a quick craft that kids can decorate themselves and add their own personal message.
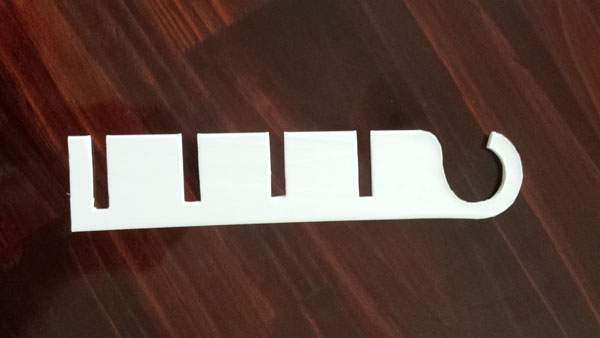
Hanging Tie Organizer
This is just like a door hanger, but with notches every two inches onto which ties can be hung. A nice way to keep ties organized and it takes up very little space when hung in the closet.

Seedling Dividers
Just like the drawer organizer plans, you’ll be adding opposing notches but at two inch intervals. The divider prevents seedling roots from intertwining; making them easier to transplant later.
Birdhouse Roof
If you’re building a birdhouse or are repairing an older wooden birdhouse, these slats make a great roof. Starting at the bottom edge of the roof, add a section of slat then add another that slightly overlaps the first. Continue until you reach the top.
Stacked Planter
Just like the type of stacked basket that’s made with popcicle sticks, but with a more contemporary look.
Ribbon Basket
Use the slats to create the spline for a basket in your preferred shape/size, then alternately weave 1 inch ribbon in and out. Drill holes on two opposing sides to add rope or ribbon handles.
Planter Stand
For this project, you’ll need to create the wooden frame first. Then add slats to all four side panels to finish the planter.
https://www.pinterest.com/pin/227924431122865817/
Foam Core Organizer Box
This will make a shoebox-sized container that is nice for organizing smaller, lightweight items. Use foam core board to create the bottom and ends of your box. Coordinating white duct tape is the best way to affix the bottom and ends together.Then add slats horizontally to both sides using hot glue to finish.
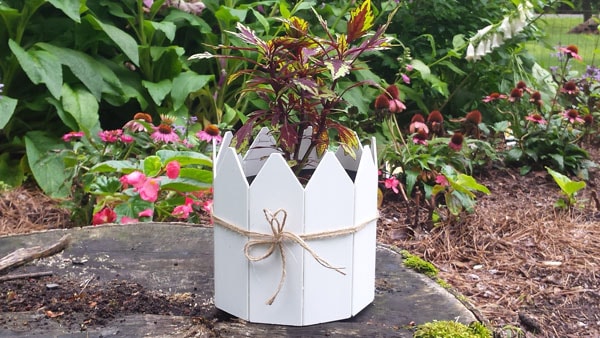
Picket Fence Decorative Planter
For a 6 inch pot, use 8 sections of slats to create a cute picket fence for your potted plants. Lay all 8 slats face down next to one another. Run a thick bead of hot glue across all 8 pieces about 1 inch from the bottom and press a ribbon into the glue. Repeat this for the top of the pickets. The glue and ribbon will ensure that the pickets stay in proper position when you are ready to attach them to the pot.
Shadow Box Shelving
Build the box shape using foam core board and add sides and shelves using the slats. Double up the slats on the sides, then add a frame to the front to finish.
Crayon Organizer
This project is identical to the seedling divider, which uses 2 inch openings. Just add a section of foam core board to the bottom.
Foam Core Birdfeeder
Wedding Program Fan Handles
Mini Lattice
Fairy Garden Benchhttps://www.pinterest.com/pin/743234744729586444/
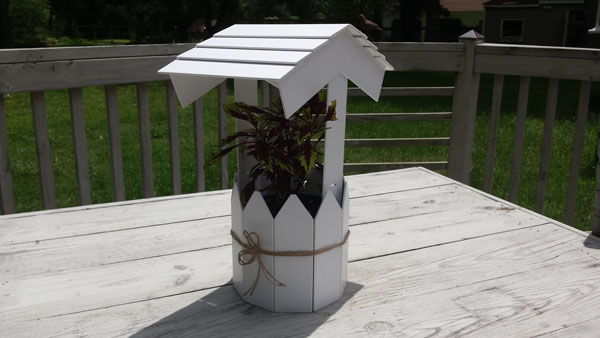
Wishing Well Planter
Here is a decorative wishing well planter for your plants. It comes in two pieces; one to slide the potted plant inside and the roof that is inserted into the soil
Doll Benchhttps://www.pinterest.com/pin/240590805068582854/
Creative Signshttps://www.pinterest.com/pin/80290805841163818/
Chicken Coop Egg Box Floor Slats
The slats are sturdy enough to use as bottoms for chicken nest boxes, with the added benefit of easier cleaning.

