We epoxied our tiled kitchen countertops and the wood mullion face trim about 4 months ago. Our only regret is that we didn’t do it years earlier. The countertops are better than we had hoped for and are a 100% improvement over our old, chipped/broken tiles with their crumbly, dirty grout lines. The best part is we have new countertops at a tiny fraction of the prices we were quoted for granite and Corian.
The added bonus of epoxy kitchen countertops is that we have NO seams (we would have had 3 using granite or Corian), and NO more caulk. We pre-made our own backsplash in a matching epoxy finish (using baseboard molding), installed it before pouring the countertop, and poured the epoxy countertop right up to the new backsplash (did I say NO caulk?).
We wanted a milky white onyx marble finish (using different translucencies of white) and decided to do the “dirty pour technique” so it would have depth and look as natural as possible. There are a ton of videos on dirty pours for a Carrara marble finish; our favorite is the Epoxy Dirty Pour Technique by Leggari Products. We used the same technique but without the grey/brown veining.
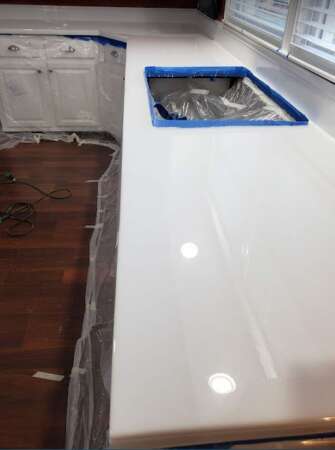
For some reason the photos make our countertops look solid white and we weren’t able to capture the marbling. This photo shows a little of the translucent veining but we couldn’t seem to get a photo that highlights the marbling.
Further below is a breakdown of how much epoxy and supplies we needed. Also included are some tips from what we learned along the way (and things we wish we had known to prepare for in advance).
How Much Epoxy Will You Need To Cover Tile Countertops
Several manufacturers recommend using 3.84 ounces of epoxy resin per square foot, which is the formula we used. You’ll need to know the square footage of your countertops. Measure each section of your countertops in inches. Add up the total inches and divide by 144 to calculate square feet.
Once you have your square footage, multiply square footage by 3.84, then divide by 64 (ounces per gallon), which will provide the number of gallons you’ll need for your countertop.
Our house is almost 90 years old and nothing is perfectly level, especially our countertops. We planned on needing 1/8″ of epoxy to level the grout lines, 1/8″ to 1/4″ for the actual design pour (due to our countertops being very unlevel), and 1/16″ of clear epoxy as a top coat. We ended up using 3 gallons of epoxy for 39 square feet of countertop space.
How Do You Prepare Tile For Epoxy?
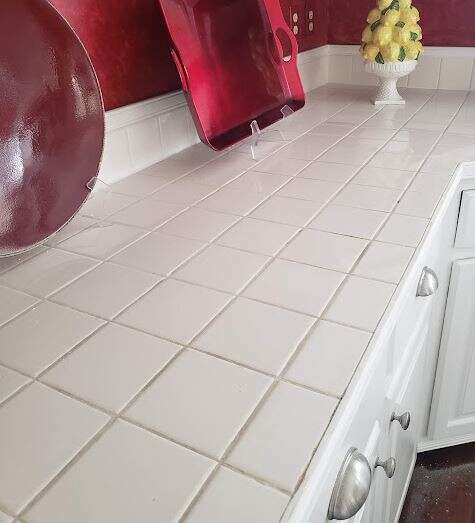
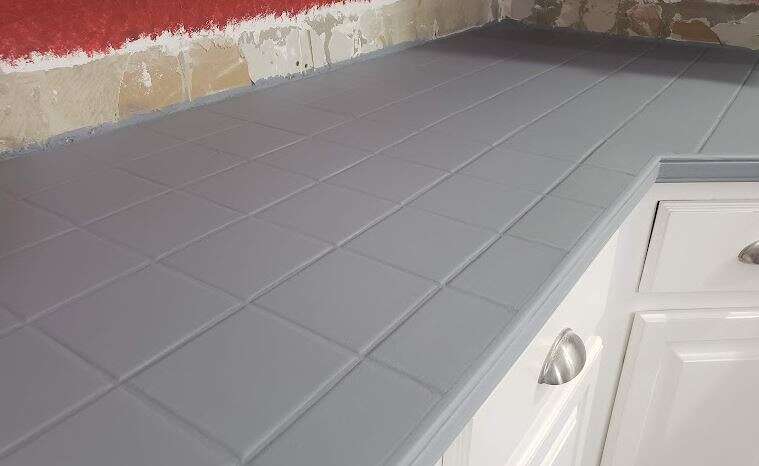
“Before” photo of kitchen tile countertop
There’s the correct way to prep tile (and then there’s the way we did it).
The Correct Way To Prep Tile For Epoxy
- Remove any caulk.
- Clean the tiles and grout using a degreaser.
- Repair/replace any loose or broken tiles.
- Chisel out any grout that is loose or crumbly.
- Use Bondo to level out grout lines. (We skipped this part and leveled out the grout lines using epoxy after completing all these steps.)
- Use Bondo to transition the front edge tiles to the countertop face edging (make sure your face trim is level with your edge tiles and is slightly rounded).
- Sand the tile using 100 grit sandpaper to remove the shiny finish.
- If tiles are uneven, continue sanding until you have a level surface.
- Caulk any gaps between your backsplash and countertop.
- Seal the entire countertop with primer.
Is A Seal Coat Necessary?
Yes. If your surface has any porous areas (AKA grout), there’s a definite possibility those porous areas will release air bubbles into your epoxy finish. You can seal with primer, paint, or epoxy. We did all three.
We did repair the tile and remove all loose/crumbly grout on our 30 year old countertop (it took forever). However, there was no way that we were going to Bondo every grout line and sand all the uneven tiles until they were level. So after the tile, grout, and face trim was prepped, we applied a coat of Epoxy-Seal as primer. This helped identify high/low areas that might give us trouble during the main epoxy application.
Bondo to repair broken tiles and transition to the face trim.
We used epoxy primer because our tile was glossy, and the epoxy primer sticks to everything. We then painted over the primer so that our Bondo, grout and wood face trim were one solid color, just in case the epoxy resin wasn’t thick enough in some areas to hide them. Then we poured a seal coat of epoxy at approximately 1/8″ deep to level out the grout lines and the uneven tile.
Kitchen tiles and face trim sealed with epoxy primer paint.
This brings us to Tip #1: Tint your primer or your seal coat of epoxy so that it is the base color needed for your actual design. Because onyx marble is translucent, we had to apply white paint over our primer seal coat so that the grout and tile didn’t show through. We could have avoided having to paint had we used a white primer or added a solid opaque dye to our epoxy seal coat. More on tinting below.
Final coat of paint before pouring the epoxy seal coat to level grout lines.
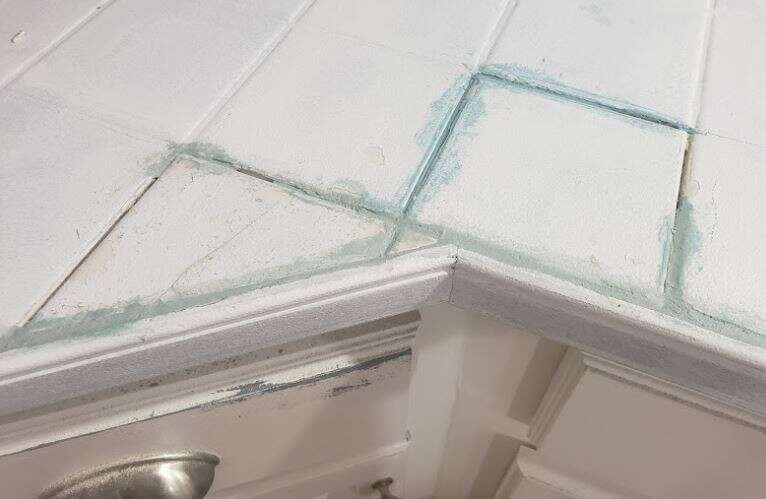
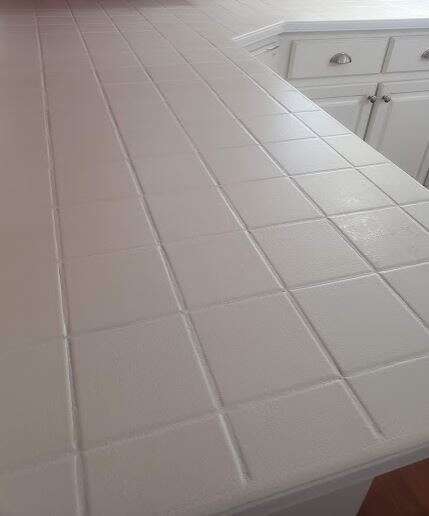
In the photo below you can see how the epoxy seal coat leveled out the grout lines. Because we didn’t tint the seal coat, the shadows of the grout lines are visible.

Epoxy seal coat over primed kitchen tiles.
Preparing Your Kitchen For Epoxy
Once you’ve prepped your countertop, you will need to prep your kitchen before you actually pour any epoxy.
- Protect your countertops by taping up plastic drop cloths.
- Use painter’s tape to create a 1 1/2″ dam above the edge of your countertop and appliance openings such as sinks.
- Apply painter’s tape on backsplash. Leave approximately a 1/4″ gap above countertop.
- Seal doorways and vents with plastic drop cloths.
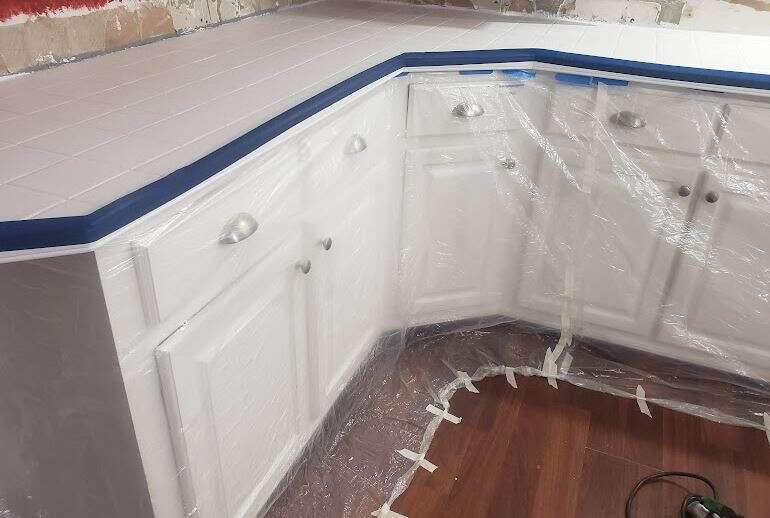
Kitchen Tile Epoxy Prep
Protect Your Cabinets
Use plastic drop cloths and masking tape to mask off your countertops. The plastic drop cloths should extend out on the floor at least 18 inches away so they can catch drips. If you’re not going to dam off your countertop edges, you should roll up the edges of your drop cloths to create a curb.
Dam Off Your Countertop Edges
Damming off your countertop edges is done by applying painter’s tape so that it sticks up about 1 to 1 1/2″ above the countertop’s edge. The tape prevents freshly-pour epoxy from freely running off the counter. This also prevents the epoxy run-off from pulling any design you’ve poured with it, which would cause your poured design to thin out and get muddy. Taping allows you to have a thicker pour and avoid those ugly, gritty finishes that happen when epoxy gets too thin and pulls away from an edge.
The biggest benefit to damming the edges is that once you’ve let the epoxy set up a bit (30 min – 2 hours), you can remove the tape and let the epoxy slowly pour over the countertop edging. It will give you a soft, rounded edge at the top of your countertop without needing to sand or reapply.
The video that’s linked above provides a really good explanation of when to remove your painter’s tape.
Protect Your Backsplash
If you have a backsplash in place, protect it with painter’s tape. Leave a quarter inch gap above the countertop. This gap will allow you to work epoxy up to the backslash’s edge. The gap also prevents tape from getting permanently embedded in your epoxy countertop when you try to pull it off later.
Dust is your enemy
Dust will create fisheyes (tiny dimples) in your epoxy surface. Some dimples are unavoidable; expect them. To reduce the amount of dust that ends up in your project, seal off all doorways and vents. Any type of airflow will lift dust into the air and onto your project. Uncured epoxy is a dust magnet.
Tip # 2: Turn off your heating/air conditioning. Even with your vents covered, a running heat pump will still circulate enough air to guarantee dust floating about. We babysat our project while it was curing for hours afterward, removing every speck of dust that landed on it. But, we didn’t turn off our heat pump; hadn’t used it in months so we didn’t even think about it. That night, outside temps dropped enough to kick on the heat pump and we awoke to dust dimples everywhere.
What Can You Use To Tint Your Epoxy?
You can use acrylic paint, resin dye, and resin powders to tint your epoxy. Resin dyes come in opaque and translucent options.
For tinting epoxy using acrylic paint, you will need a maximum of 2 ounces of acrylic paint for each quart (16 ounces) of epoxy (or 8 ounces per gallon).
This is where we learned Tip #2: White acrylic paint will result in a off-white (almost yellowish) result, even if it’s bright white or ultra white. Acrylic paint might work better for tinting accent veining but we don’t recommend it for tinting your base epoxy color. For a predominantly white epoxy like our onyx marble design, you will need 1 bottle (1 ounce) of white Alumilite opaque liquid resin dye for each gallon of epoxy. We hadn’t ordered enough bottles of Alumilite and ended up buying two other brands locally (big, big mistake).
The other brands of dye we bought locally were too translucent and had a very yellow hue to them. We ended up not having enough white epoxy dye to create the solid white veining we wanted in our countertop.
Supplies You Will Need For Applying Epoxy
Fortunately you can buy most of your disposable supplies from your local dollar store. This includes buckets, large plastic mixing containers, small mixing containers, silicone spatulas, brushes, plastic forks, foam rollers, drop cloths, latex gloves and masking tape.
You will want to use painter’s tape for creating a dam at the countertop edge, as well as the sink opening and backsplash. Painter’s tape pulls away from epoxy better than masking tape and, if removed at the right time, comes off clean and does not leave a residue.
A critical must-have item is denatured alcohol, which is another thing we did not have enough of on hand. Denatured alcohol cleans up sticky, uncured epoxy from almost everything. But more importantly, it helps smooth out the face of your countertop edging and any accidental impressions (like thumbprints). Pour some on your glove and you’ll be able to beautifully smooth out the epoxy drips as they slowly flow down your edging.
Quantities we used for 3 gallons of epoxy:
This list is a combination of what we bought in advance, and what ended up running out mid-project to buy because we were short.
- 1 quart Bondo
- Epoxy-Seal primer paint
- 3 two gallon plastic buckets
- 3 long paint sticks (to stir epoxy resin and hardener in buckets before transferring to other containers tinting)
- 6 two quart round plastic containers (for large batches of tinted epoxy)
- 8 silicone spatulas (for stirring large batches of tinted epoxy)
- 6 small plastic mixing containers (for mixing small batches of tinted epoxy)
- 1 box of plastic forks (for stirring small batches of tinted epoxy)
- 5 small foam rollers (for applying primer and smoothing out uneven epoxy when sealing and top coating, for applying epoxy to backsplash)
- 2 rolls two inch masking tape
- 2 boxes of latex gloves (about 50-100) – anytime the gloves got sticky we got a new pair
- 8 rolls of plastic drop cloths (enough to protect your cabinets, work surface, and seal doorways)
- 3 inch rolls of painter’s tape
- 2 quarts of denatured alcohol (1 quart for every 2 gallons of epoxy being applied)
- 1 long, thin sewing needle (to pick out dust or bugs that find their way onto the uncured epoxy surface)
- 3 bottles Alumilite pigment dye, 1 bottle iridescent mica powder for veining
We also used work lights to help identify problem areas during the pour, a heat gun to release air bubbles from the epoxy’s surface, and a metal putty knife to scrape drips from the bottom of the trim.
How Long Does It Take To Epoxy Tiled Countertops?
Prepping our tile countertops and applying epoxy resin took a total of 4 days, working evenings approximately 4-6 hours at a time. Most of that time (3 days) was spent in prep work. The actual pour only took 20 minutes, with the remainder of the day spent babysitting the edges (smoothing), scraping drips, and patrolling the surface for dust.
The Actual Epoxy Pour
Prep
- Draw out your pour pattern on a piece of paper and hang it above your countertop for reference.
- Set up work lights so that the lights reflect the top of the countertop. They will highlight missed areas during your pour.
- If there are problem areas on your prepped countertop (i.e. one tile sticks up a little more than the rest), tape a note above it so that you’ll remember where it is and be able to address it during the pour.
Mixing and Pouring
- Always measure and pour the harder first, then add the resin.
- Mix the clear epoxy first for 1/2 of the recommended mixing time.
- Transfer the clear, mixed epoxy into smaller containers for tinting, tint the epoxy, and mix for the remaining mixing time.
- Pour quickly. The longer the epoxy sits in containers, the faster it sets up. Pour it immediately after mixing to extend working time.
- Use a silicone spatula to work the epoxy up to the backsplash, to push it up to the painter’s tape at the edge, and to fill any epoxy gaps on the surface.
- Add any veining or touch ups to the design.
- Use a brush to tap the epoxy’s surface if you need to feather out the design.
Get Rid Of Air Bubbles
- Use a heat gun and go over every inch of the epoxy to release air bubbles.
- Touch up anything that looks like it needs it, then go over the entire surface one more time with the heat gun.
- Use a long, thin sewing needle to remove any bits of dust from the surface. This will leave a small indentation that should level itself out. If it doesn’t, lightly apply a little heat to the area using a heat gun.
Remove The Tape Dam To Epoxy Face Trim
- Refer to the linked video (above) on how to test when the tape is ready to be removed.
- If removed too soon, the epoxy will run down the side of the face trim too quickly.
- If removed too late, the epoxy will barely drip down and you’ll need to lightly apply heat to help it along and manually smooth it out using denatured alcohol.
- As the epoxy works it way down and is the face trim is about 75% covered, use your gloved hand to smooth it out along the entire surface.
- If the epoxy finish is uneven or has started to set up too much to smooth out, coat your gloved hand with denatured alcohol and use pressure to smooth it out.
Deal With The Face Trim Drips
- Using a metal putty knife held at an angle, scrape off the drips on the bottom of the face trim.
- Coat your gloved hand with denatured alcohol and smooth it the bottom of the face trim.
- Repeat this process for the next several hours until no more drips appear.
- If you miss some drips, you can sand them off later. You will need to wear a respirator when sanding.
Is A Top Coat Necessary
From what we’ve read, a top coat isn’t an absolute necessity but it does provide UV, scratch and chemical resistance. It does provide an extra level of protection from stains or damage for your underlying finished design. We abused our tile countertops, so having a top coat on the epoxy design was important. If the countertop becomes stained or damaged, we would hopefully be able to repair the damage and reapply clear epoxy without having to match the underlying countertop design. Some kits offer polyurethane top coats in gloss or matte finishes. The only drawback to urethane top coats is that they do add a “textured” look to your surface. We just used a 1/16″ clear epoxy as our top coat. We applied within the epoxy manufacturer’s recommended application time so that we wouldn’t have to sand in between applications.
How Long Before You Can Use Epoxied Countertops?
Most manufacturers recommend waiting 48-72 hours before “lightly” using your countertops and waiting 7-10 days before placing heavy objects on your countertops. Epoxy resin countertops take 30+ days to fully cure. These times vary depending on the depth of your epoxy pour.
Tip# 5: Pour some extra epoxy to use as a cure sample. Line a small shallow plastic container with cling wrap. Right after you’ve mixed your epoxy, pour about a 1/2 inch of epoxy into the lined container and set it aside for 2 days. Lift the epoxy out of the plastic container using the cling wrap to pull upward. Occasionally test this epoxy sample (instead of your countertop) to monitor its cure rate. Once the sample is fully cured, you’ll know your countertops are fully cured as well.
We avoided touching our new countertops for a week (one week with no kitchen sink) and, because we had depths of epoxy up to 1/4+ inch, we waited more than 3 weeks before placing kitchen appliances on the countertop.
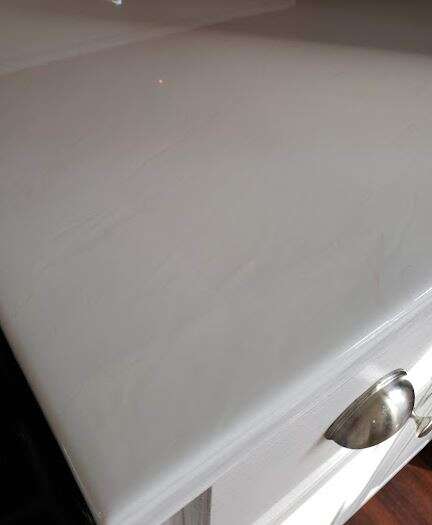
The Finished Epoxy Over Tile Kitchen Countertop
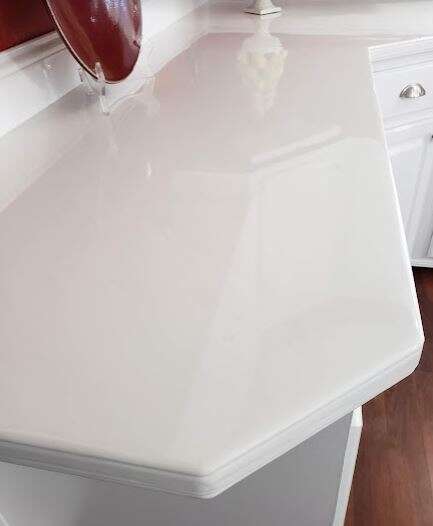
Wish the translucent marbling could be seen in the photos. But you can see that the tile and grout is gone! The countertop has a great glass-like reflective quality and the old wood trim facing now looks like it’s a part of the countertop itself. And the bonus is that there is no caulk needed at the backsplash.
Pros And Cons Of An Epoxy Countertop
Pros Of An Epoxy Countertop
(when compared to tile or stone)
- It’s affordable!
- No countertop seams
- No grout or caulk lines
- It’s beautiful!
- It’s durable (compared to stone)
- You don’t need artistic ability for a “dirty pour”
- Our old wood mullion face trim integrated perfectly with the countertop.
Having cleaned the grout on our old tile countertops for almost 3 decades, there’s no words to describe how amazing the epoxy countertop is.
Cons Of An Epoxy Countertop
- There will be minor imperfections
- It’s not as durable as tile
- An all-white or predominantly white countertop can amber over time
- If you’re not doing a “dirty pour”, you’ll need some artistic ability to avoid it looking fake
To be honest, we abused our old tile countertops. We cut food directly on them, put hot pots on them, used them as a working surface for any and every project. When we considered marble or Corian countertops, we were told that they would not hold up to our abuse. So in fairness, the durability “con” of epoxy would also be applicable to stone or Corian.
Because we didn’t turn off our heat pump after applying epoxy, we ended up with a lot of dust dimples in our finish. But they don’t detract from the glass-like finish, aren’t very noticeable and we still love the end result. The other “con” is that there is also a big thumbprint on one corner of the countertop for which no one has yet accepted responsibility.
Final Tips
Have a few small projects on hand to make use of your leftover epoxy. We covered the top of a plant stand and make some coasters with our leftover epoxy.
If you’re nervous about how the countertops will turn out, first create an epoxied sample board to see if you are happy with the results.

